Getting started with iOS 10

This post covers the important APIs or features to be noticed in iOS10.

What’s deprecated ?

API’s related to notifications are deprecated, use UserNotification framework instead.

All of the notification handling methods has been deprecated, try to adopt to the UNUserNotificationCenterDelegate protocol and new delegate methods accordingly.

What’s new?

Haptic Feedback:

In iOS 10 we can get user’s feedback using UIFeedbackGenerator and it’s subclasses according to the scenario.

SiriKit:

To make your app’s services and content available from Siri, we can use SiriKit. This provides support for the following services.

  • Audio or video calling
  • Messaging
  • Sending or receiving payments
  • Searching photos
  • Booking a ride
  • Managing workouts
  • Adjusting settings in a CarPlay-enabled vehicle (automotive vendors only)
  • Making restaurant reservations (requires additional support from Apple)

Proactive Suggestions:

We can make our app listed down in list of suggestions in Safari search results, Siri, Spotlight using several new APIs in iOS 10. Using this makes the system suggest your app to users at appropriate times.

Some of the APIs that include proactive suggestion,

  • NSUserActivity
  • Core Spotlight
  • MapKit
  • UIKit
  • Media Player frameworks

Messages framework for interacting with your app from iMessages app:

You can create Sticker packages or a custom UI to interact with your app when the user is currently using iMessages app by creating App extensions.

We can create the Sticker pack or app extension using Messages.framework.
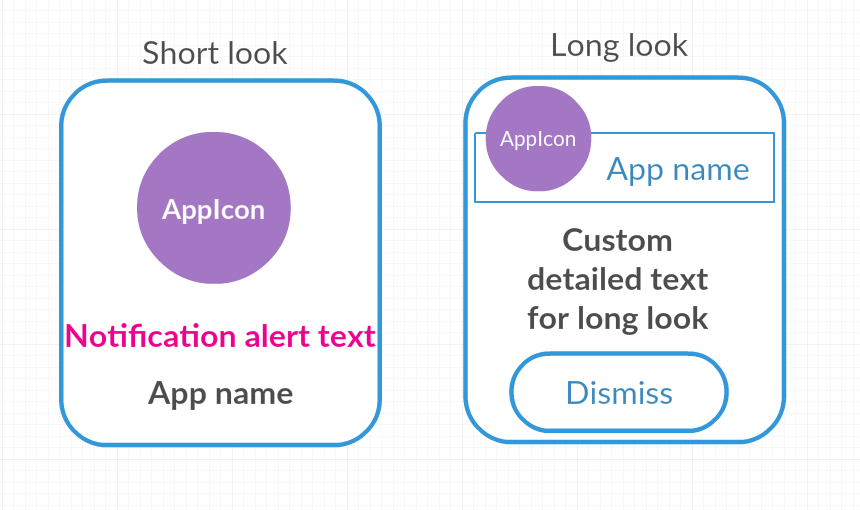
User Notifications:

iOS 10 introduces the UserNotifications framework to schedule, customize and handle the notifications (Local or Remote). We can also customize the UI of the notification using UserNotificationsUI.framework.

API’s to use,

  • UserNotifications.framework
  • UserNotificationsUI.framework

Speech Recognition:

Using the APIs in the Speech framework , you can perform speech transcription of both real-time and recorded audio. Since you are using user’s voice recognition you have to request and get User’s permission. To request the user’s permission, you must add the NSSpeechRecognitionUsageDescription key to your app’s Info.plist file and provide content that describes your app’s usage.

App Search Enhancements:

CoreSpotlight framework and NSUserActivity API’s has several enhancements for improved Search functionality in and through your app.

CallKit:

Now you can create App extension to enable call blocking and caller identification using CallKit, Also your VoIP app can integrate CallKit to interact with the iPhone UI and give users a great experience.

New App Extensions:

iOS 10 introduces several new extension points for which you can create an app extension, such as:

  • Call Directory
  • Intents
  • Intents UI
  • Messages
  • Notification Content
  • Notification Service
  • Sticker Pack

For detailed API differences, refer this page.


Performance tuning of your iOS app using Instruments

A powerful tool that you can use to improve your app’s performance which comes along with Xcode itself. Instruments provides so many options inside to analyse, test and improve the memory usage and performance of an iOS app.

What you can do using Instruments,

  • Analyze performance issues in your app
  • Check for memory leaks
  • Check for any continuously running method which blocks your main thread
  • Find zombies that leads to crash
  • Find your app’s memory usage

What are the tools to use,

  • Allocations
  • Timeprofiler
  • Zombies
  • Leaks
  • Activity Monitor

How to run or launch instruments,

  • Clicking on Profile icon (or)
  • Command + I (or)
  • Xcode -> Product -> Build for -> Profiling

instruments1

After start running instruments the above selection panel will show up, select the tool as per your need.

Profile Memory Usage of your app:

  • Allocations allows you to analyze the abandoned memory
  • Activity Monitor allows you to find over all memory usage
  • Use Leaks to find the memory leaks
  • Use Zombies with the detection of over released Zombie objects

Improve performance of your app:

  • Activity monitor allows you to find the CPU usage of your app
  • Time Profiler to check the time related processes
  • Use Counters to find the events occurs in the processor. Can check for excessive no of events of same type

How to use Allocations ?

  • Select allocations from the panel
  • Start recording using the Record (image: ../Art/inline_record_button_2x.png) button
  • Cmd+2 -> shows Inspector pane
  • Shows the Overall bytes generated/destroyed/live
  • Mark generation to inspect a specific task
  • Check whether the memory is getting deallocated by checking the Statistics
  • Check Call trees to view the methods which is creating the bytes

allocations

Leaks

Memory that is allocated to an object that are no longer referenced or reachable

How to identify Memory Leaks?

  • Select Leaks from the panel
  • Start recording using the Record (image: ../Art/inline_record_button_2x.png) button
  • Cmd+2 -> shows Inspector pane
  • Shows the Leaks in the Timeline panel
  • Leaks are marked as red in the Leaks timeline
  • Click on the leak mark to view more details about it
  • Check the details pane for responsible caller
  • Can view the method in Xcode for editing purpose

leaks1

leaks
Leaks view with responsible caller


Zombies :

Objects that are called after they’ve been released and no longer exist.

How to find Zombies?

  • Select Zombies from the panel
  • Start recording using the Record button
  • Do the steps that leads your app to crash because of zombie objects
  • Once it crashes you will be able to see the responsible caller by clicking on the arrow mark
  • Can rectify the issue and profile it once again
  • Toggle the environment variable NSZombieEnabled to true
  • This tells the compiler to substitute the zombie object as an NSZombie object

Zombies.png

Time Profiler: Make use of this tool for resolving time related issues. When going through your application, at some places/screens it might take time to load or respond. You can see what’s happening or what’s using the time behind using Time profiler.

This takes the stack trace of your app at particular time intervals.

Time Profiler.png
Check the running time of each method & navigate to the caller
screen-shot-2016-09-20-at-2-49-22-pm
Toggle between these call tree options to navigate to the responsible caller


These are the important tools that we need to improve our App’s performance generally. Please write to me in case of any clarifications or concerns.

Thanks for reading 🙂


Actionable Remote notifications OR Interactive Remote notifications

Before reading this post, know about push notification in this post.

This is a cool feature from iOS8 which allows user to interact with remote notifications. For each notification the user receives, user don’t need to open the app for making the appropriate action. You can provide interactive notifications for that very purpose and design your actions and buttons while registering for remote notifications itself.

Follow these steps to create interactive notifications:

Step 1:

We need 3 classes to design an interactive notification,

1. UIMutableUserNotificationAction : Create the action you want to perform using this class (This will add a button in the notification with the title provided). This can act as a button or text input. You can customise this by setting “behavior“.

  • UIUserNotificationActionBehaviorDefault
  • UIUserNotificationActionBehaviorTextInput

2. UIMutableUserNotificationCategory: Create a category and add the actions that you created earlier. This can be of two types,

  • UIUserNotificationActionContextDefault
  • UIUserNotificationActionContextMinimal

3. UIUserNotificationSettings: Create this object with notification alert style and categories.

Copy paste this method to your AppDelegate, and call this method in didFinishLaunchingWithOptions

- (void)registerForRemoteNotificationWithCategories {

    UIMutableUserNotificationAction *acceptAction = [[UIMutableUserNotificationAction alloc] init];

    acceptAction.title = @"Accept";

    acceptAction.identifier = @"accept";

    acceptAction.destructive = NO;

    acceptAction.activationMode = UIUserNotificationActivationModeBackground;

    acceptAction.authenticationRequired = NO;

    
    UIMutableUserNotificationAction *declineAction = [[UIMutableUserNotificationAction alloc] init];

    declineAction.title = @"Decline";

    declineAction.identifier = @"decline";

    declineAction.destructive = NO;

    declineAction.activationMode = UIUserNotificationActivationModeBackground;

    declineAction.authenticationRequired = NO;

   
    NSArray *actionsArray = [NSArray arrayWithObjects:acceptAction,declineAction, nil];

   
    UIMutableUserNotificationCategory *invitationCategory = [[UIMutableUserNotificationCategory alloc] init];

    invitationCategory.identifier = @"Invitation";

    [invitationCategory setActions:actionsArray forContext:UIUserNotificationActionContextMinimal];

  
    UIUserNotificationSettings *notificationSettings = [UIUserNotificationSettings settingsForTypes:UIUserNotificationTypeAlert | UIUserNotificationTypeBadge | UIUserNotificationTypeSound categories:[NSSet setWithObject:invitationCategory]];

    [[UIApplication sharedApplication] registerUserNotificationSettings:notificationSettings];

}

Step 2:

Register for remote notification after creating categories and notificationSettings

 [[UIApplication sharedApplication] registerForRemoteNotifications];

Step 3:

We have to send category identifier in payload to handle these notifications

"aps" : { 
    "alert"    : "Its meeting time. Meeting with Aswath",
    "category" : "Invitation"
}

Step 4:

Handle the actions in the following application delegate method

- (void)application:(UIApplication *)application handleActionWithIdentifier:(NSString *)identifier forRemoteNotification:(NSDictionary *)userInfo completionHandler:(void (^)())completionHandler {
 {
     if ([identifier isEqualToString:@"accept"]) {
           NSLog(@"accept tapped.");
    }
    else if ([identifier isEqualToString:@"decline"]) {
           NSLog(@"decline tapped.");
    }
    if (completionHandler) {
        completionHandler();
    }
}

Screenshots for your reference,

InteractiveNotificationBanner

InteractiveNotificationinNotificationCenter

Silent remote notifications and background fetch will be written as a new post.


Watch OS, A complete walkthrough

We are living in a modern world where engineers started incorporating computers in all living and non living things around. One of the most interesting thing that we had in 2014’s Consumer Electronics show is Wearable Technology, though it has been evolved earlier.

Apple and Google released their own Smart watches in 2014. We all have got a new interesting API to work on and that is WatchOS.

Mobile apps have limitations when compared to PC apps, Same like Smart watch apps has limitation when compared to Mobile apps.

Start programming for Apple watches today,

Developing for Apple Watch means providing your users with important, helpful, and impactful information in the most immediate, convenient way.

Your watch app contains two separate bundles,

  1. Watch app
  2. Watchkit extension

Screen Shot 2016-08-26 at 1.00.20 pm

Watch app contains the UI components, Storyboards, Resources and WatchKit extension contains Controllers for managing the actions of UI items.

There are few components in Watch app,

  1. Glances
  2. Notifications
  3. Complications

Glances:

  • A single screen which is non scrolling, read only and meant for very important information. (i.e Airline app might display gate information and departure time for an upcoming flight)
  • Tapping on the Glance screen launches your watch app
  • Glance screen is readonly, So doesn’t contain Controls

Screen Shot 2016-08-26 at 1.13.58 pm

Notifications:

Both Local & Remote notifications can be received by your watch app which is paired with iPhone app. Notifications has static interface by default. It can be designed in custom style by “Has Dynamic Interface” in Storyboard. Notification screen has two different looks.

  1. Short look – Shows up once the user raises up his wrist

2. Long look – This will show up if the user keeps his wrist raised for sometime         (meaning looking at the notification)

You can create actionable notifications like iOS and there are WKExtensionDelegate methods available to handle the action items in the notification interface.

Screen Shot 2016-08-26 at 3.49.41 pm

Complications:

These are small elements which appear in Watch face. As user can customize the watch face, this might be shown as per the space and position available. Also user can choose complications to install. System already provides few built in complications like weather info, calendar events etc.

WatchComplication

Complications work with Clockkit framework, to load and display the data in timely manner.

Managing complications:

  1. Identify the data you want to display in your complication
  2. Select the complication template
  3. Implement datasource to provide data to Clockkit

Writing a Watch application, creating the above features will be written as separate post.

Thanks for reading. Happy learning 🙂

All about Apple Push Notifications

Hello Techies!!!

Being an Apple developer we cannot compromise when it comes to user experience and design. A mobile app has to be designed and developed in such a way that it should not affect the device’s performance, battery and storage.

Imagine you are developing an eCommerce mobile app and your app has to be synced up with server all the time. We cannot let our app run always since it will drain the battery. Apple won’t allow any app to run in background after a particular background time. OS itself terminates or moves the app to suspended state at one point.

So what will you do to let your user know, when there is a new deal or product available?

Here comes the idea of Push notifications.

A picture that depicts the flow of push notification,

Screen Shot 2016-08-24 at 4.33.42 pm

There is a security architecture which establishes the secured connection between your server and Apple server. We have to upload APNS certificate in the server to make a trustable connection. Thus apple server identifies the valid service provider (your app server).

Here is the step by step process for making your app ready for receiving push notifications.

Step 1:

Paste these lines in didFinishLaunchingWithOptions method.

UIUserNotificationSettings *notificationSettings = [UIUserNotificationSettings settingsForTypes:UIUserNotificationTypeAlert | UIUserNotificationTypeBadge | UIUserNotificationTypeSound categories:nil];
[[UIApplication sharedApplication] registerUserNotificationSettings:notificationSettings];
[[UIApplication sharedApplication] registerForRemoteNotifications];

This will throw an privacy popup to user. Once the user taps “OK” your app will receive device token in the following delegate method.

- (void)application:(UIApplication *)application didRegisterForRemoteNotificationsWithDeviceToken:(NSData *)deviceToken {

    NSString *pushToken = [[deviceToken description] stringByTrimmingCharactersInSet:[NSCharacterSet characterSetWithCharactersInString:@"<>"]];

   pushToken = [pushToken stringByReplacingOccurrencesOfString:@" " withString:@""];

   NSLog(@"Device token received: %@", pushToken);

//Once you receive the device token send it to your server

}

OR

your app might receive an error in registering for any reason, which can be handled in the following method.

- (void)application:(UIApplication*)application didFailToRegisterForRemoteNotificationsWithError:(NSError*)error

{
    NSLog(@"Failed to receive device token with error: %@", error);
}

Step 2:

Consider you sent the device token to your server once received. Now your app is ready to go. When you receive a remote notification the following method will get called regardless of your app’s state (Foreground or Background).

- (void)application:(UIApplication *)application
didReceiveRemoteNotification:(NSDictionary *)userInfo
fetchCompletionHandler:(void (^)(UIBackgroundFetchResult result))handler {

// userInfo is the JSON payload from server. Handle the notification here

}

Step 3:

Understanding APNS payload structure:

userInfo is a dictionary where in it contains another dictionary for key “aps“. This aps dictionary contains the “alert“, “sound” and “badge” count generally.

The aps dictionary might contain other keys when it comes to actionable notification, silent notification, such as  “content-available” and “category“.

Other than “aps” dictionary, your server can send app related details along with this dictionary in payload.

An example for payload dictionary :

{

"aps" : {

"alert" : “This is a sample message for APNS”

"badge" : 1

},

"acme" : "This is the app related value that your app might need extra in the payload"

}

Limitation of APNS payload:

  • From iOS 8 the maximum size allowed for APNS payload is 2 kilo bytes
  • Prior to iOS 8 the maximum size allowed for payload is 256 bytes

Playing Custom sound when receiving Remote notifications:

Your app can play a custom sound for each notification it receives. The sound files has to be bundled with the app. The name of the file has to be mentioned in the “aps” dictionary accordingly.

{

"aps" : {

"alert" : “This is a sample message for APNS”

"badge" : 1

"sound" : "sample.wav"

}

}

Step 4:

There are situations like where you have to unregister for remote notifications (i.e Logout). Where you have to call the following method of UIApplication object.

- (void)unregisterForRemoteNotifications;

Troubleshooting issues with Remote notifications:

You have done all the above steps right yet don’t receive push notifications, Don’t panic. There is a checklist which might help you troubleshoot.

  1. Check whether your app’s profile has APNS enabled and you are using right profile
  2. APNS certificate (Which is uploaded to your app server) might expired or revoked. Check for it once.
  3. Apple server might be down at times. (Check whether other apps are receiving push notifications)

I don’t want to load everything in single post since I haven’t included Silent notifications and Actionable notifications, which will be written as separate post.

Reading is to the mind what exercise is to the body. Happy reading !! 🙂

From NSURLConnection to NSURLSession

Since NSURLConnection is deprecated, iOS developers are in a point to move to NSURLSession. In this post we will deeply travel through NSURLSession API.

For creating network  requests I see most of the lazy people go for 3rd party frameworks or libraries. But it seems very odd that those are just wrappers around apple’s native APIs. Instead of spending time on those 3rd party libraries start writing your own way of network requests handling. BTW apple makes this job easier by introducing NSURLSession.

NSURLSession has the following objects to create a network request,

1. NSURLSessionConfiguration : This helps to create a session which has 3 types for 3 different purposes

  • defaultSessionConfiguration
  • ephemeralSessionConfiguration
  • backgroundSessionConfiguration

2. NSURLSession : This is the building block for making network requests which can be created using any of the above configuration

3. NSURLSessionTask: This object actually drives the session for uploading and downloading data. Which comes in three types,

  • NSURLSessionDataTask
  • NSURLSessionUploadTask
  • NSURLSessionDownloadTask

A Classic example for making network requests using NSURLSessionDataTask

This example downloads a sample zip file and it is implemented using NSURLSession delegates. There is another approach where you can use blocks (completion handlers) for handling error and success response.

Add NSURLSessionDataDelegate, NSURLSessionDelegate to your Class. We need to implement these delegate methods for handling the data.

Add this line to your .h file

@property (nonatomic, strongNSMutableData *totalContentData;

Create a configuration which suits requirement. Following example is with default configuration. All you need to do is call hitServerForUrl method by passing the file download URL.

- (void)hitServerForUrl:(NSString*)urlString {

    NSURL *requestUrl = [NSURL URLWithString:urlString];    

    NSURLSessionConfiguration *defaultConfigurationObject = [NSURLSessionConfiguration defaultSessionConfiguration];

    NSURLSession *defaultSession = [NSURLSession sessionWithConfiguration:defaultConfigurationObject delegate:self delegateQueue: nil];

    NSURLSessionDataTask *dataTask = [defaultSession dataTaskWithURL:requestUrl];

    [dataTask resume];

}

- (void)URLSession:(NSURLSession *)session dataTask:(NSURLSessionDataTask *)dataTask

didReceiveResponse:(NSURLResponse *)response

  completionHandler:(void (^)(NSURLSessionResponseDisposition disposition))completionHandler {

    completionHandler(NSURLSessionResponseAllow); //This line makes your request to be continued. 

}

- (void)URLSession:(NSURLSession *)session task:(NSURLSessionTask *)task

didCompleteWithError:(nullable NSError *)error {

    if (error) {

       //Handle error here

        _totalContentData = nil;

   }

    else {

        if (task.state == NSURLSessionTaskStateCompleted) {//Once completed write the data as file to documents directory

            NSString *fileName = [task.response suggestedFilename];

            if (_totalContentData) {

                NSArray *paths = NSSearchPathForDirectoriesInDomains(NSDocumentDirectory, NSUserDomainMask, YES);

                NSString *documentsDirectory = [paths objectAtIndex:0];

                NSString *path = [NSString stringWithFormat:@"%@/%@", documentsDirectory, fileName];
 NSLog(@"Path :%@", path);

                [_totalContentData writeToFile:path atomically:YES];

            }

        }

    }

}

- (void)URLSession:(NSURLSession *)session dataTask:(NSURLSessionDataTask *)dataTask

    didReceiveData:(NSData *)data {

    if (_totalContentData == nil) {

        _totalContentData = data.mutableCopy;

}

    else {

        [self mergeData:_totalContentData withData:data.mutableCopy]; //Merging the data we received with already received data

    }
}

- (void)mergeData:(NSMutableData*)alreadyReceivedChunk withData:(NSMutableData*)newlyReceivedChunk {
 //Merges the two parameters
 if (![self isAlreadyMergedData: newlyReceivedChunk]){
 [alreadyReceivedChunk appendBytes:[newlyReceivedChunk bytes] length:[newlyReceivedChunk length]];
 _totalContentData = alreadyReceivedChunk;
 }
}

- (BOOL)isAlreadyMergedData:(NSMutableData*)dataToBeMerged {
 //Checks for the totalContentData whether it has already merged the new content
 
 NSRange range = [_totalContentData rangeOfData:dataToBeMerged options:0 range:NSMakeRange(0, [_totalContentData length])];
 if (range.location != NSNotFound) {
 // assuming the subdata doesn't have a specific range
 return YES;
 }
 
 return NO;
}

An example for file download using NSURLSessionDownloadTask

This example uses NSURLSessionDownloadTask to download files from server. In this I have demonstrated an example of tracking the file download progress. This example also uses the delegate approach.

Apple has provided an easy way to handle data that your app is downloading. You can remove all the messy work(merging chunks, removing duplicated data, writing total data to a file) that we have done in the above example.

Call hitServerForUrl with file download URL as a parameter

//Download Task example
- (void)hitServerForUrl:(NSString*)urlString {
 
 NSURL *requestUrl = [NSURL URLWithString:urlString];
 
 NSURLSessionConfiguration *defaultConfigurationObject = [NSURLSessionConfiguration defaultSessionConfiguration];
 
 NSURLSession *defaultSession = [NSURLSession sessionWithConfiguration:defaultConfigurationObject delegate:self delegateQueue: nil];
 
 NSURLSessionDownloadTask *fileDownloadTask = [defaultSession downloadTaskWithURL:requestUrl];
 
 [fileDownloadTask resume];
 
}

- (void)URLSession:(NSURLSession *)session downloadTask:(NSURLSessionDownloadTask *)downloadTask didFinishDownloadingToURL:(NSURL *)location {
 
 NSString *documentsPath = [NSSearchPathForDirectoriesInDomains(NSDocumentDirectory, NSUserDomainMask, YES) firstObject];
 NSURL *documentsDirectoryURL = [NSURL fileURLWithPath:documentsPath];
 NSURL *documentURL = [documentsDirectoryURL URLByAppendingPathComponent:[downloadTask.response suggestedFilename]];
 NSError *error;
 
 NSString *filePath = [documentsPath stringByAppendingPathComponent:[downloadTask.response suggestedFilename]];
 NSLog(@"file path : %@", filePath);
 if ([[NSFileManager defaultManager] fileExistsAtPath:filePath]) {
 //Remove the old file from directory
 }
 
 [[NSFileManager defaultManager] moveItemAtURL:location
 toURL:documentURL
 error:&error];
 if (error){
 //Handle error here
 }
}

- (void)URLSession:(NSURLSession *)session task:(NSURLSessionTask *)task didCompleteWithError:(NSError *)error {
 if (error != nil) {
 NSData *resumeData = error.userInfo[NSURLSessionDownloadTaskResumeData];
 self.downloadResumeData = resumeData;
 }
}

- (void)URLSession:(NSURLSession *)session downloadTask:(NSURLSessionDownloadTask *)downloadTask
 didWriteData:(int64_t)bytesWritten
 totalBytesWritten:(int64_t)totalBytesWritten
totalBytesExpectedToWrite:(int64_t)totalBytesExpectedToWrite {
 dispatch_sync(dispatch_get_main_queue(), ^{
 float progressValue = totalBytesWritten/totalBytesExpectedToWrite;
 [self.downloadProgressView setProgress:progressValue animated:YES]; //Change ur progressView instance here
 });
}

An example for file or content upload using NSURLSessionUploadTask

This example demonstrates how to use NSURLSessionUploadTask for uploading contents to server. I have used completion handlers for this example.

- (void)doUploadFilesToServer:(NSData*)dataToBeUploaded atUrl:(NSURL*)uploadTaskUrl {

    NSMutableURLRequest *uploadUrlRequest = [NSMutableURLRequest requestWithURL:uploadTaskUrl];

    uploadUrlRequest.HTTPMethod = @"POST";

    NSURLSessionConfiguration *defaultConfiguration = [NSURLSessionConfiguration defaultSessionConfiguration];

    NSURLSession *fileUploadSession = [NSURLSession sessionWithConfiguration:defaultConfiguration];

    NSURLSessionUploadTask *uploadTask = [fileUploadSession uploadTaskWithRequest:uploadUrlRequest fromData:dataToBeUploaded completionHandler:^(NSData * _Nullable data, NSURLResponse * _Nullable response, NSError * _Nullable error) {

        if (error != nil) {

            NSLog(@"File upload failed with error : %@", error.description);

        }

        else  {

            NSLog(@"Successfully uploaded");

            //Handle response here

        }

    }];

    [uploadTask resume];

}

We can also use delegates to handle NSURLSessionUploadTask, but just to cover both delegates & block approach I have used completion handler in this example.

I hope you all enjoyed reading this post. Happy reading !!! 🙂


Getting started with iOS 9

Each developer has to update himself as the Technology  grows each day. Getting to know new stuff makes you stand out of the crowd.

First lets take a look at what is deprecated in iOS9, which API’s cannot be used anymore.

What’s deprecated?

  • The Address Book and Address Book UI frameworks has been deprecated. Use Contacts and Contacts UI instead
  • The NSURLConnection API in the foundation framework has been deprecated. Use NSURLSession APIs instead

What’s new in iOS9?

1. Multitasking enhancements for iPad

Apple enhances the multitasking experience of iPad in iOS9 by introducing following features,

  • Slide Over” provides a user-invoked overlay view on the right side of the screen.
  • Split view” displays two side-by-side apps, letting the user view, resize and interact with both of them.
  • Picture in Picture” lets an user play video in a moveable window that floats over the apps on screen

2. App Transport Security

App transport security encourages security by imposing a number of security best practices. With ATS enabled, network requests are automatically made over the HTTPS instead of HTTP.

If your app is making network requests over HTTP then you have to specify the exceptions in your info.plist.

3. 3D Touch

People can choose app-specific actions from Home screen by pressing on the app icon.

3D Touch APIs for developers:

* UIApplicationShortCut

*UIViewControllerPreviewing

* UITouch has new properties for supporting force touch

4. Search

Provides deep search and make your app’s content searchable.

Search APIs:

NSUserActivity

CoreSpotlight Framework

5. App Thinning

Slicing: Allows the Appstore to deliver only what is needed for installation.

On-Demand Resources: Stores additional app content in AppStore repository and delivers it over an asynchronous request or installation.

BitCode: Archive your app for submission to the AppStore in an intermediate representation

6. Live Photos (From iOS9.1)

Allows user to capture their favourite moments as a Live photo (Include more content and before & after images). PHLivePhoto has been added to Photos framework to support Live photos.

7. APIs for supporting Apple Pencil (Stylus)

UITouch has been updated with the following methods.

preciseLocationView:

precisePreviousLocationInView:

altitudeAngle

azimuthAngleInView:

azimuthUnitVectorInView:

8. UIStackView

Stack views provide a way to lay out a series of views horizontally or vertically. By configuring a few simple properties such as alignment, distribution, and spacing, you can define how the contained views adjust themselves to the available space.

9. Storyboard References

This gives a easy way to organise multiple storyboards in same project. If you and another developer is working on the same storyboard, you may face issues(Conflicts) in committing the Project. Using this we can split up like one storyboard for each use case.

10. UI Testing using XCTest Framework

For UI Testing XCTest has been added with UITesting bundle which can be used from Xcode7 and iOS9.

Happy learning !!! I will be writing soon for all the mentioned above features in detail.